
- what is Docker
- Basic Docker commands
- Networking: (Cross) Container communication.
- Docker volume and bind mounts
- create container network
- Build multi application with docker
- What is Docker compose
- Why we need Docker compose
- What Docker Compose is NOT
- Writing Docker Compose Files
- What are Utility Containers
- The target setup
- Why we need docker
- Development to Production: Things To Watch Out For
- Bind Mounts, Volumes \& COPY
- A Basic First example: Standalone Nodejs App
- managing and updating the Container
what is Docker
Docker is an open source platform that enables developers to build, deploy, run, update and manage containers—standardized, executable components that combine application source code with the operating system (OS) libraries and dependencies required to run that code in any environment.
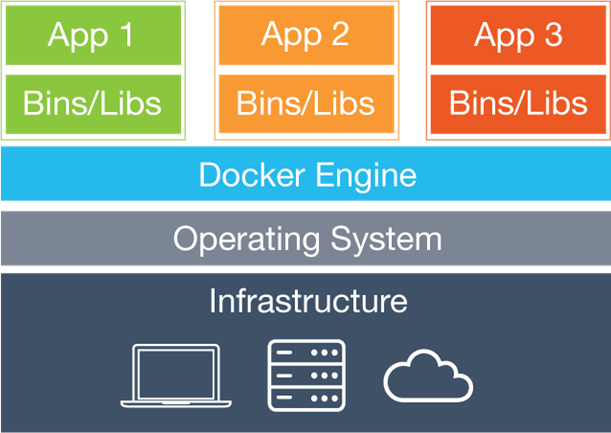
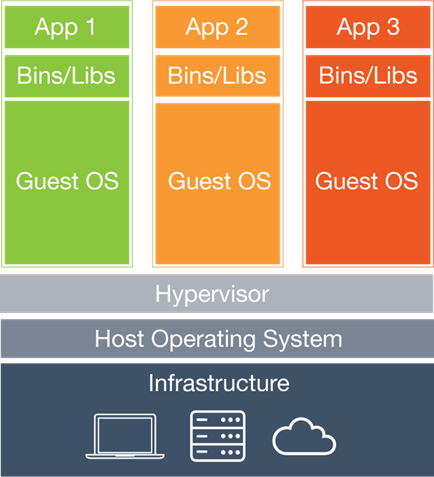
docker vs virtual machine
How this all works together
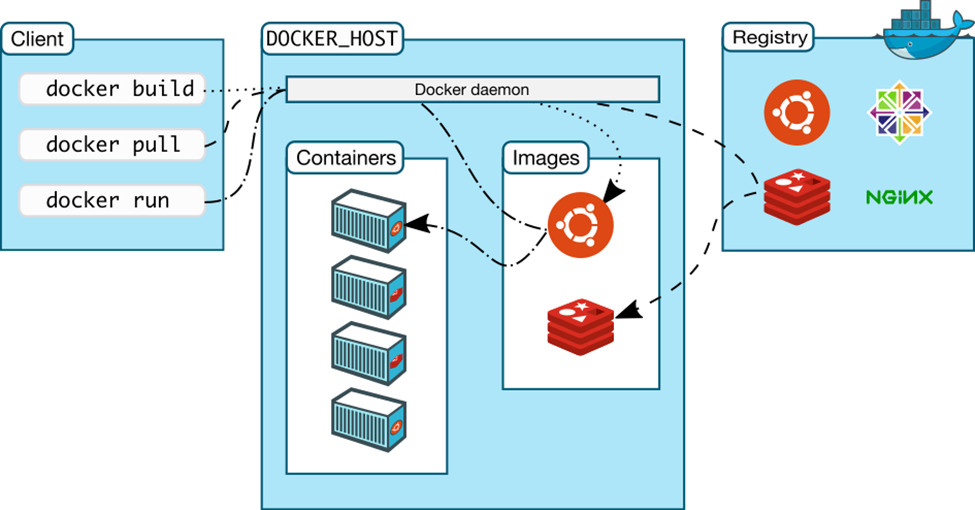
Docker client gives a call to Docker host to run a container from a particular image. If Docker host has that image, it run a container from it. If it does not have the image, it looks for it in the registry and pulls it on the host and then runs a container from it. Note that any of these three components can be on the same machine or on different machines.
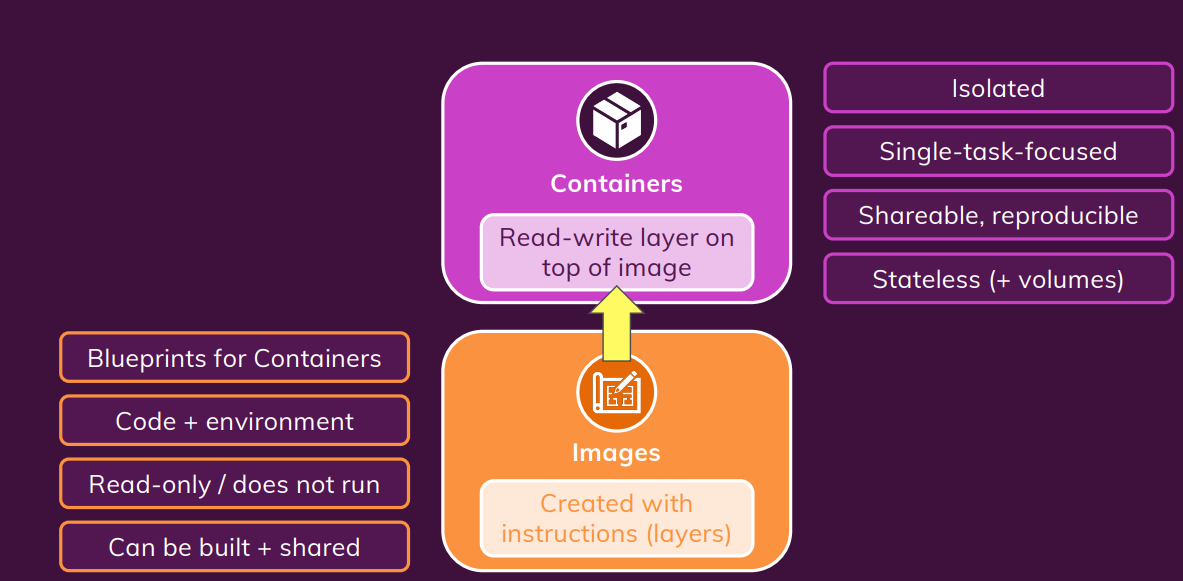
Docker Core Concepts.
Docker Setup
please refer to this link when install docker
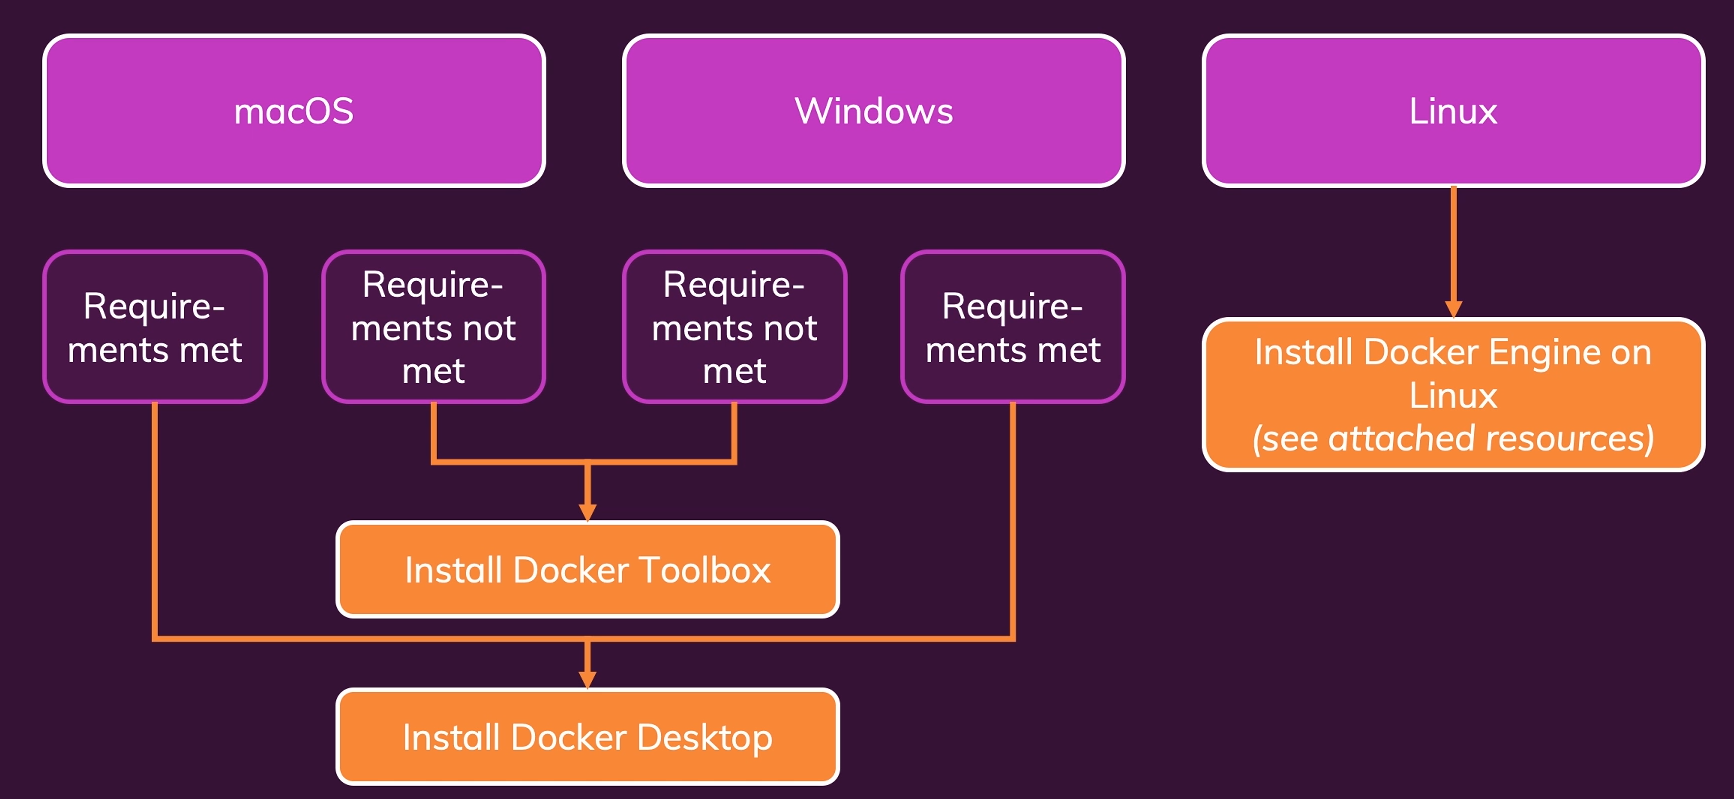
- I recommend you try using DigitalOcean to create your own enviromon on linux.
I put the link for 60 days free and 100$ if your want to try

install docker on linux follow below instructor link.
https://docs.docker.com/engine/install/ubuntu/
install docker engine
sudo apt-get install docker-ce docker-ce-cli containerd.io docker-compose-plugin
Basic Docker commands
List all running containers
sudo docker ps
List all running and stopped containers
sudo docker ps -a
List all docker images
sudo docker images
pull docker images
sudo docker pull [image name]
run docker
sudo docker run -d -p 3000:80 --name [docker name] --rm [image name]
docker logs
sudo docker logs
stop running docker
sudo docker stop <container id/name>
Remove container
sudo docker rm <container id/name>
Remove docker images
sudo docker rmi <imageid/image name>
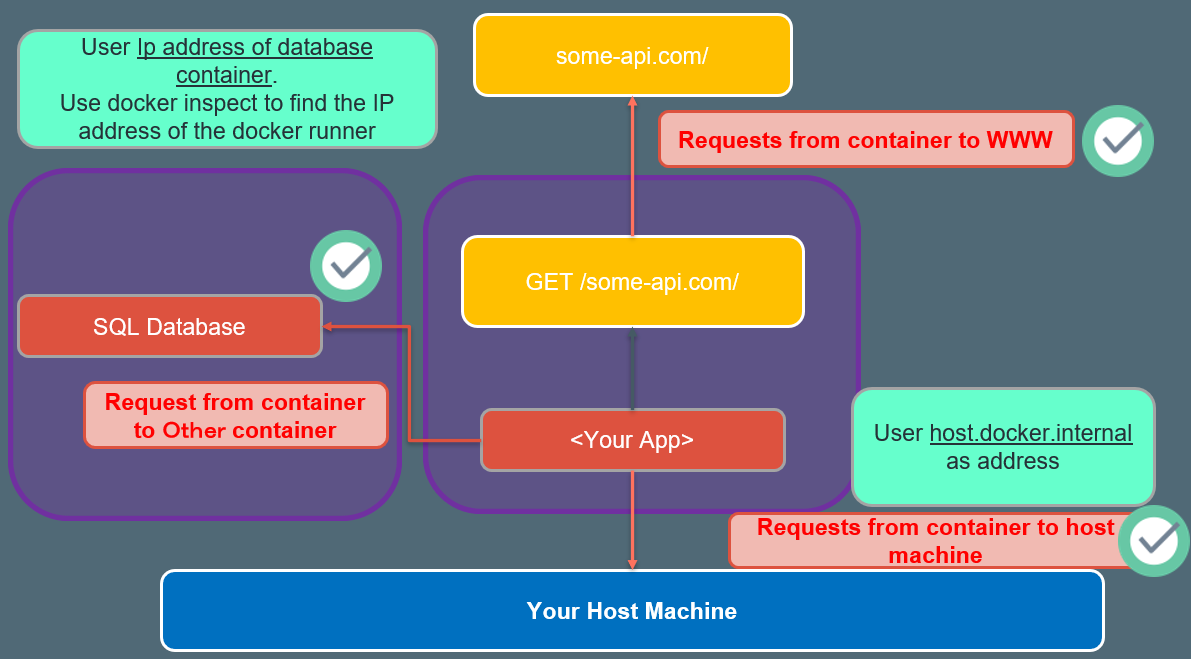
Networking: (Cross) Container communication.
three scenario of container comunication.
Docker build
docker build -t myimage:1.0 .
docker run
docker run -d --name favorites --rm -p 3000:3000 favorites-node
docker stop
docker stop [container name]/[container id]
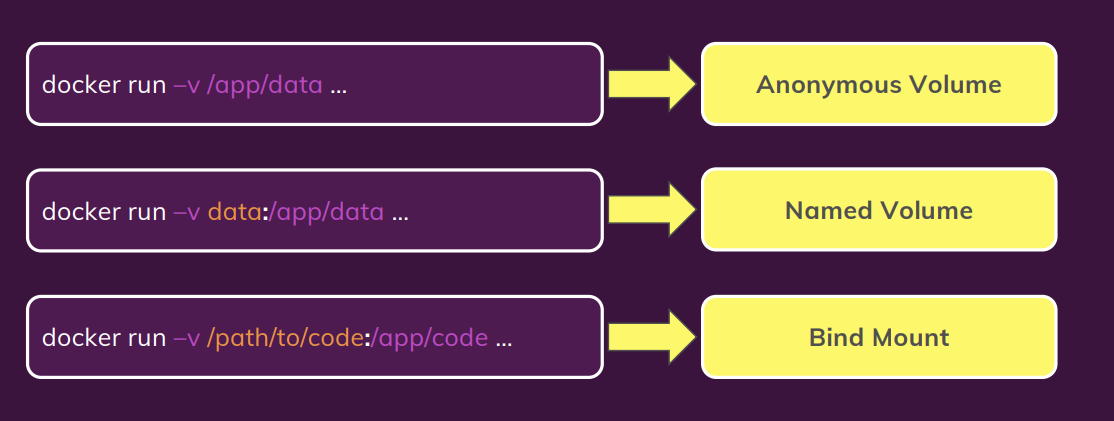
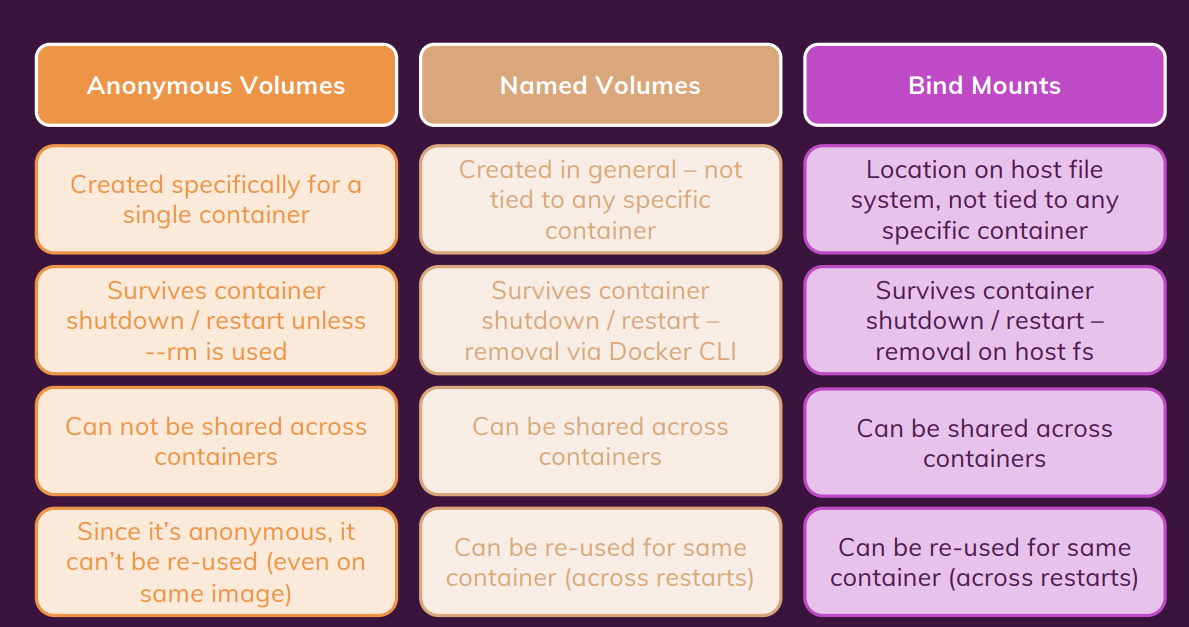
Docker volume and bind mounts
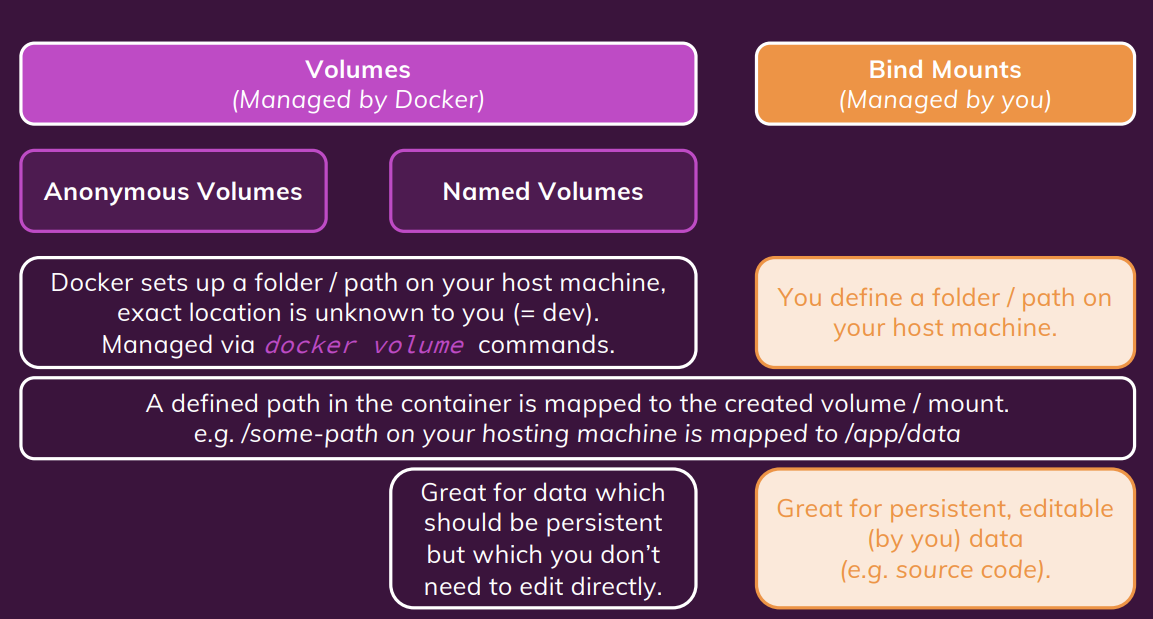
Named volumes (Add -v command)(the name here is feedback which could be anything)
docker run -d --name runner_1 -v feedback:/app/feedback -p 8000:80 --rm testDocker:01
remove unuse volume
docker volume rm VOL_NAME
or
docker volume prune
If you start a container without --rm, the anonymous volume would NOT be removed, even if you remove the container (with docker rm …).
Bind Mounts
docker run -d --name runner_1 -v feedback:/app/feedback -p 8000:80 --rm -v [absolute path of host machine]:/app testDocker:01
as default, volume is read/write. if we want to protect our volume on host machine we can add another option to restrict docker from overwrite to folder on our host machine.
docker run -d --name runner_1 -v feedback:/app/feedback -p 8000:80 --rm -v [absolute path of host machine]:/app:ro testDocker:01Bind Mounts - Shortcuts
Just a quick note: If you don’t always want to copy and use the full path, you can use these shortcuts:
- macOS / Linux:
-v $(pwd):/app- Windows:
-v "%cd%":/app
Understanding Container / Volume Interaction
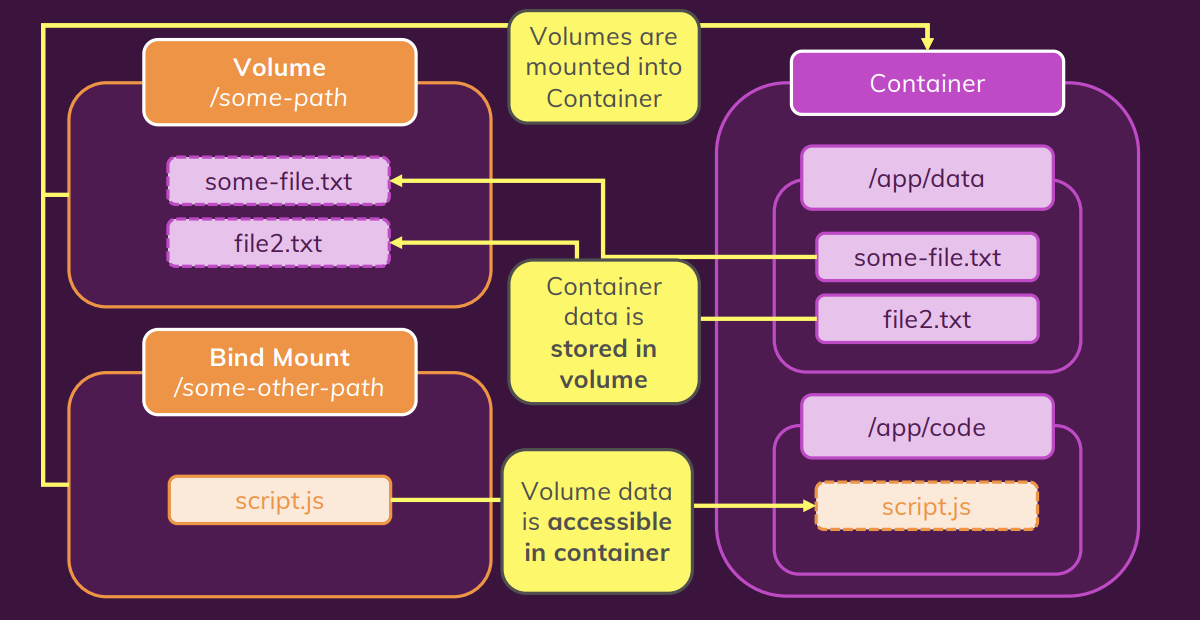
An Anonymous Volume can protect the data on container from being overite by the bind mounts mapping
docker run -d --name runner_1 -v feedback:/app/feedback -p 8000:80 --rm -v [absolute path of host machine]:/app -v /app/node_modules testDocker:01summary
ARGuments & ENVironment Variables.
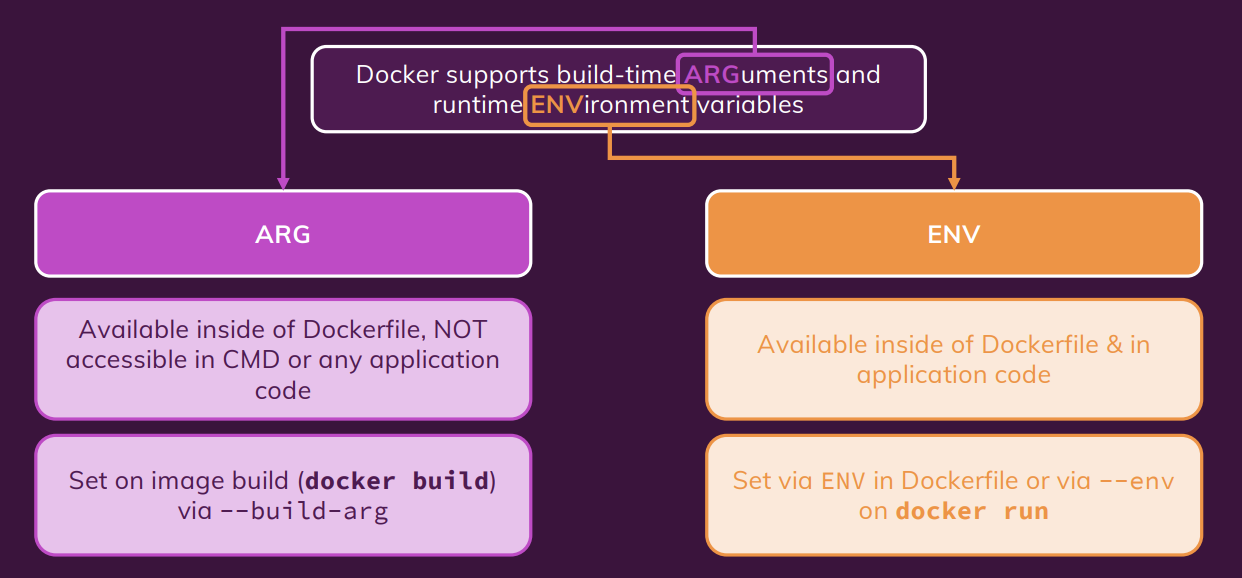
working with Environment variable & “.env”
# docker file
ENV PORT 80

EXPOSE $PORT
# docker command
docker run -d --name runner_1 -v feedback:/app/feedback -p 8000:8000 --env PORT = 8000 --rm -v [absolute path of host machine]:/app  -v /app/node_modules testDocker:01
We can add more evn variable by continuing adding
--evn or -e variableName = valuewe can also add evironment variable to .env file and using below command to run docker.docker run -d --name runner_1 -v feedback:/app/feedback -p 8000:8000 --env-file ./.env --rm -v [absolute path of host machine]:/app -v /app/node_modules testDocker:01Using Build Arguments (ARG)
```shell #Docker file
ARG DEFAULT_PORT 80
EXPOSE $DEFAULT_PORT
```shell
docker build -t [image name]:[tag]  --build-arg DEFAULT_PORT = 8000 .
create container network
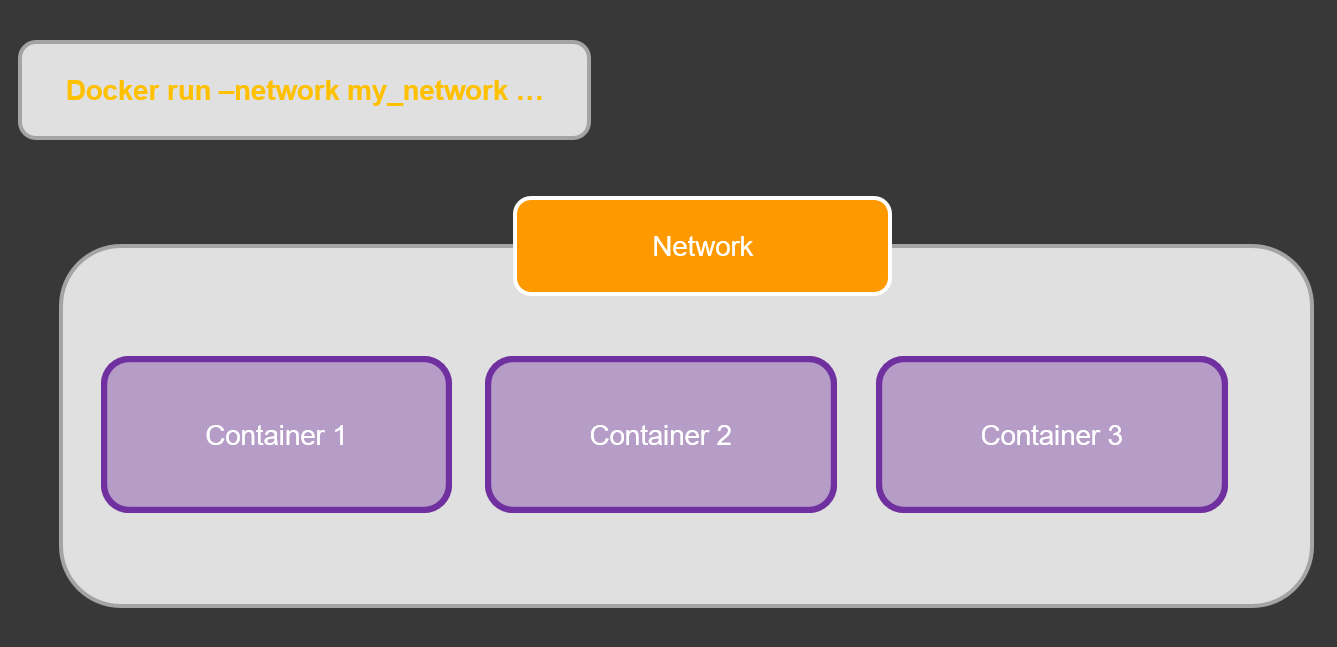
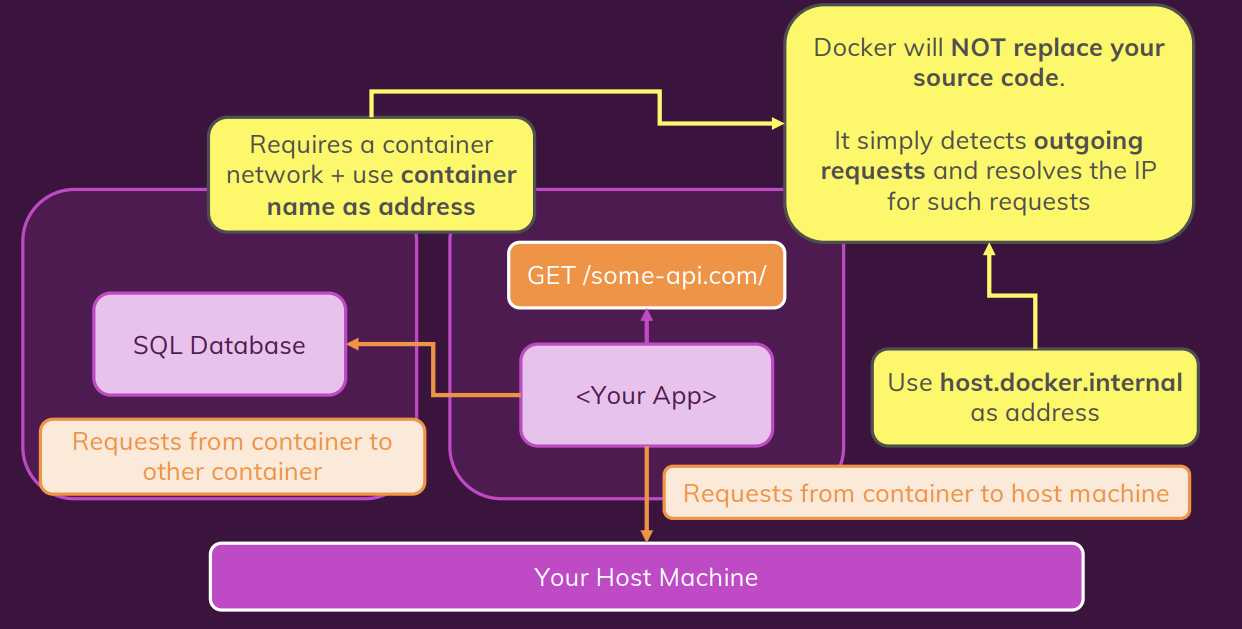
Within a Docker network, all containers can communicate with each other and IPs are automatically resolved.
Containers & Network Requests.
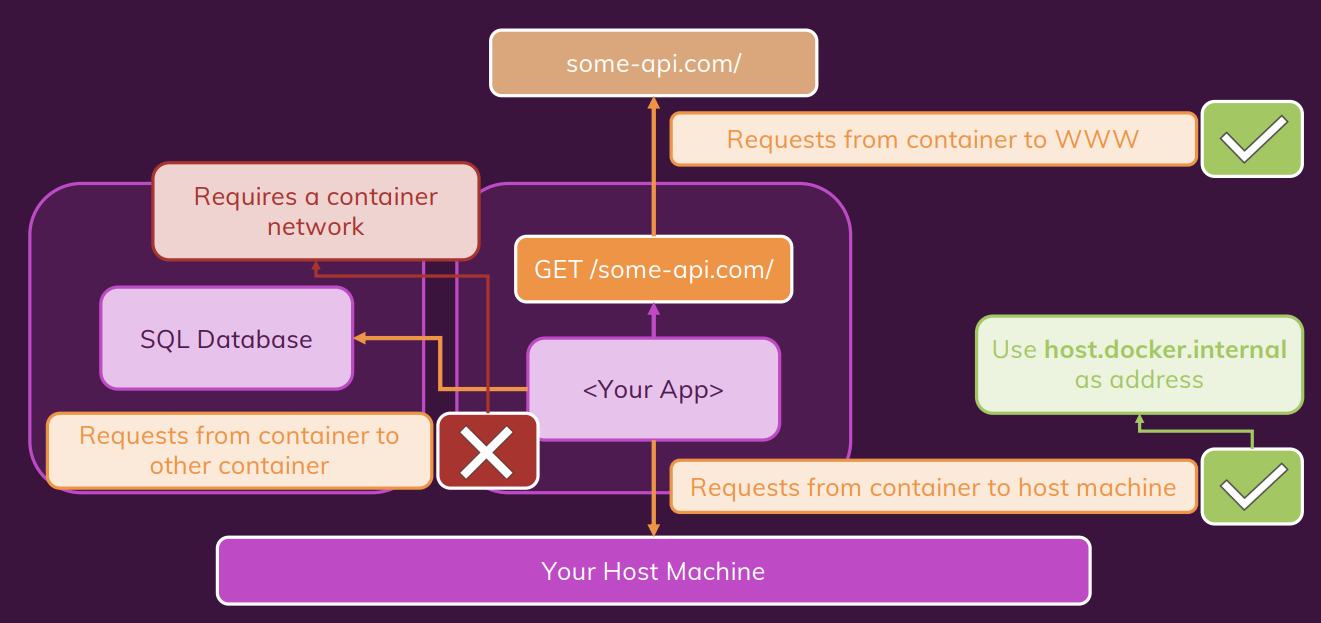
Understanding Docker Network IP Resolving.
create container network
docker network create favorites-net
docker run -d --name mongodb --network favorites-net mongo
Docker Network Drivers
Docker Networks actually support different kinds of “Drivers” which influence the behavior of the Network.
The default driver is the “bridge” driver - it provides the behavior shown in this module (i.e. Containers can find each other by name if they are in the same Network).
The driver can be set when a Network is created, simply by adding the --driver option.
docker network create --driver bridge my-net
Of course, if you want to use the “bridge” driver, you can simply omit the entire option since “bridge” is the default anyways.
Docker also supports these alternative drivers - though you will use the “bridge” driver in most cases:
- host: For standalone containers, isolation between container and host system is removed (i.e. they share localhost as a network).
- overlay: Multiple Docker daemons (i.e. Docker running on different machines) are able to connect with each other. Only works in “Swarm” mode which is a dated / almost deprecated way of connecting multiple containers
- macvlan: You can set a custom MAC address to a container - this address can then be used for communication with that container
- none: All networking is disabled.
- Third-party plugins: You can install third-party plugins which then may add all kinds of behaviors and functionalities.
As mentioned, the “bridge” driver makes most sense in the vast majority of scenarios.
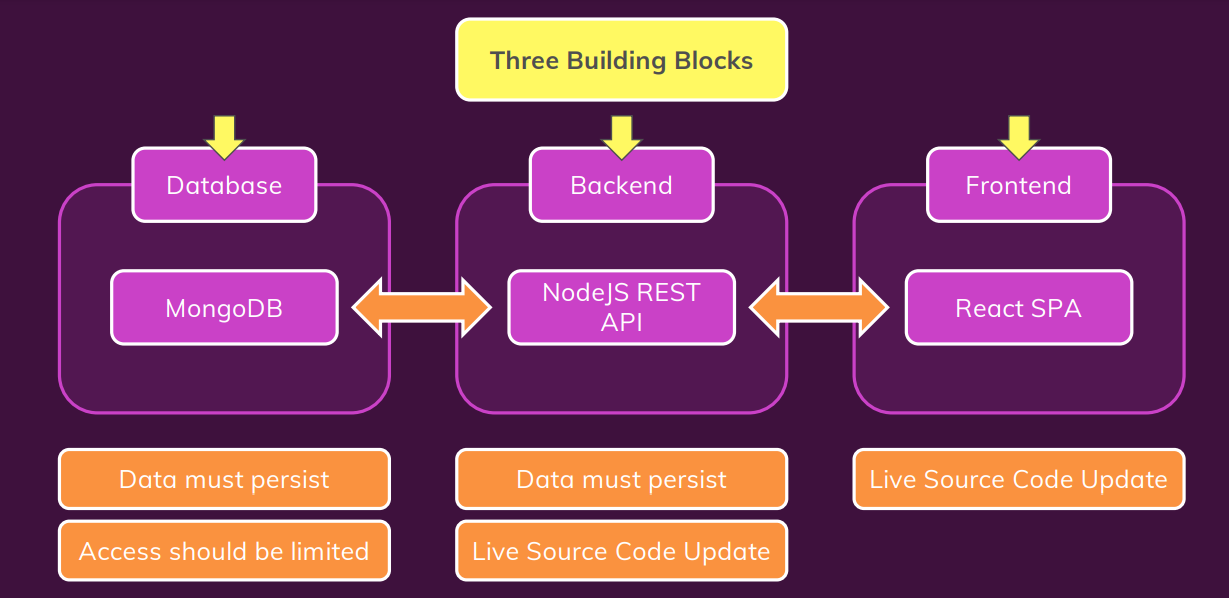
Build multi application with docker
Build the multi appication with front end, back end and mongo database.
dockerizing mongo database service.
please refer to this site on docker hub website for more information on how to use mongo database with docker.
docker run --name mongodatabase -d --rm -p 27017:27017 mongo
dockerizing backend server
create the dockerfile to build the backend image.
FROM node:14

WORKDIR /app

COPY package.json /app

RUN npm install

COPY . /app

EXPOSE 80

CMD ["node","app.js"]
modify the localhost:27017 :arrow_right: host.docker.internal:27017 to able to connect with mongo database.
docker run --name backend_app -d --rm -p 80:80 backend:1.1
dockerizing front end server
create the dockerfile to build the frontend image.
FROM node:14

WORKDIR /app

COPY package.json .

RUN npm install

COPY . .

EXPOSE 3000

CMD ["npm", "start"]
docker run --name frontend_app -d --rm -p 3000:3000 frontend:1.1
make docker networks
create docker networks.
docker network create app-net
run the container with networks.
before running the back end server, we need to change the IP address of mongo db to container name in order to comunicate with mongodb container.
host.docker.internal:27017 :arrow_right: mongodb:27017
the IP adress in the front end app also need to change to the backend container name.
localhost/goals :arrow_right: backend_app/goals
docker run --name mongodb -d --rm --network goals-net mongo

docker run --name backend_app -d --rm -p 80:80 --network goals-net backend:1.1

docker run --name frontend_app -d --rm  -p 3000:3000 frontend:1.1
there is one problem if we stop MongoDB and run it again, the data from it will be removed and we lost our data. As a result, we need to add the volume to prevent data from being lost when the container is stopped. For inspecting purposes, a bind mount can also be used to store data on a local host machine.
docker run --name mongodb -d --rm -v data:/data/db --network goals-net mongomongodb image also supports
MONGO_INITDB_ROOT_USERNAMEandMONGO_INITDB_ROOT_PASSWORDfor creating a simple user with the role root in the admin authentication database, as described in the Environment Variables section above.
docker run --name mongodb -d --rm -v data:/data/db --network goals-net -e MONGO_INITDB_ROOT_USERNAME=Yushin -e MONGO_INITDB_ROOT_PASSWORD=admin mongo
Create volume for persit the log data from back end app and bind mount to update source code from our host machine.
docker run --name backend_app -d --rm -p 80:80 -v "D:\Source\Git\Docker\multi-01-starting-setup\backend":/app -v logs:/app/logs -v :/app/node_modules --network goals-net backend:1.1
we can add environment variable to control the authentication of mongodb from outside of container. the environment variable can be declare in docker file and replace with username and password in sever.js file.
```dockerfile EXPOSE 80
ENV MONGODB_USERNAME=root ENV MONGODB_PASSWORD=admin
CMD [“npm”,”start”]
```javascript
mongoose.connect(
  `mongodb://${process.env.MONGODB_USERNAME}:${process.env.MONGODB_PASSWORD}@mongodb:27017/course-goals?authSource=admin`,
  {
    useNewUrlParser: true,
    useUnifiedTopology: true,
  },
docker run --name backend_app -d --rm -p 80:80 -v "D:\Source\Git\Docker\multi-01-starting-setup\backend":/app -v logs:/app/logs -v :/app/node_modules --network goals-net -e MONGODB_USERNAME=yushin backend:1.1
Create volume for persit the log data from front end app and bind mount to update source code from our host machine.
docker run -v "D:\Source\Git\Docker\multi-01-starting-setup\frontend\src":/app/src --name frontend_app -d --rm -p 3000:3000 frontend:1.1the nodemon or auto reflect code change module won’t be able to use in window.
Development vs Production/ Deployment
Room for Improvement
What is Docker compose
Compose is a tool for defining and running multi-container Docker applications. With Compose, you use a YAML file to configure your application’s services. Compose works in all environments: production, staging, development, testing, as well as CI workflows.
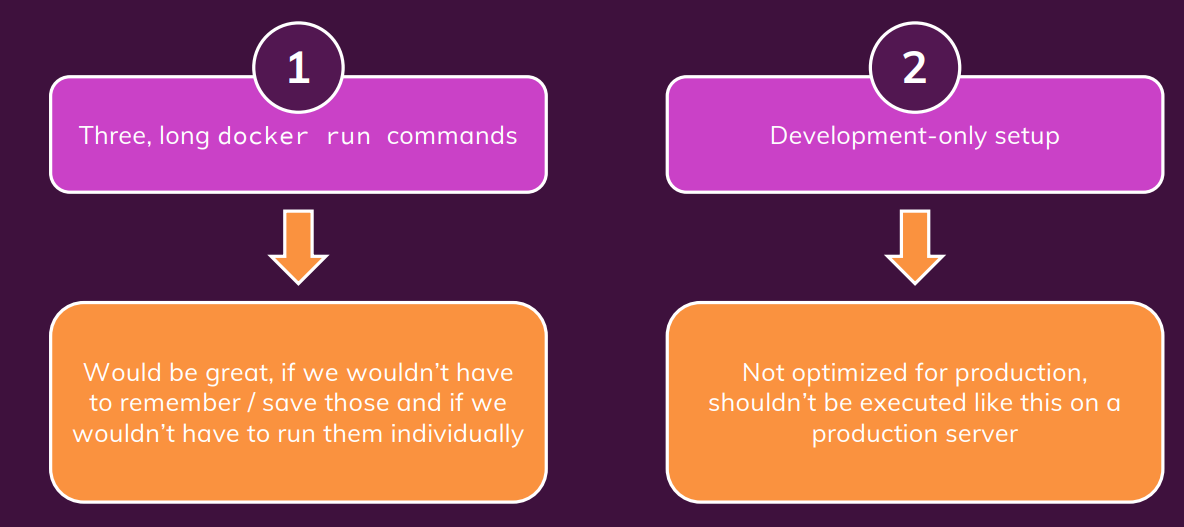
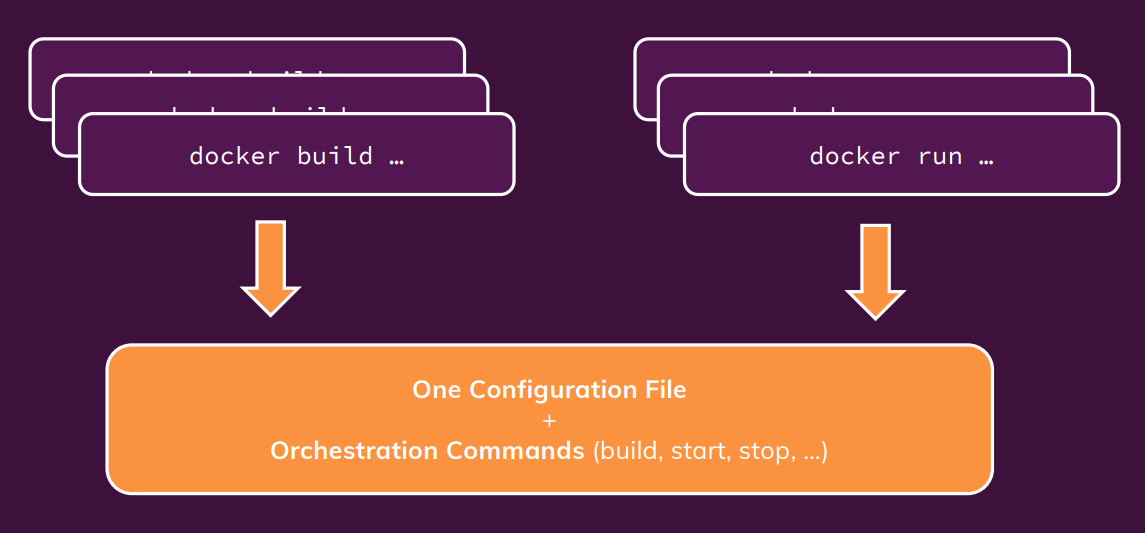
Why we need Docker compose
Consider this example:
docker network create shop
docker build -t shop-node .
docker run -v logs:/app/logs --network shop --name shope-web shop-node
docker build -t shop-database
docker run -v data:/data/db --network shop --name shop-db shop-database
This is a very simple (made-up) example - yet you got quite a lot of commands to execute and memorize to bring up all Containers required by this application.And you have to run (most of) these commands whenever you change something in your code or you need to bring up your Containers again for some other reason. With Docker Compose, this gets much easier You can put your Container configuration into a docker-compose.yaml file and then use just one command to bring up the entire environment: docker-compose up
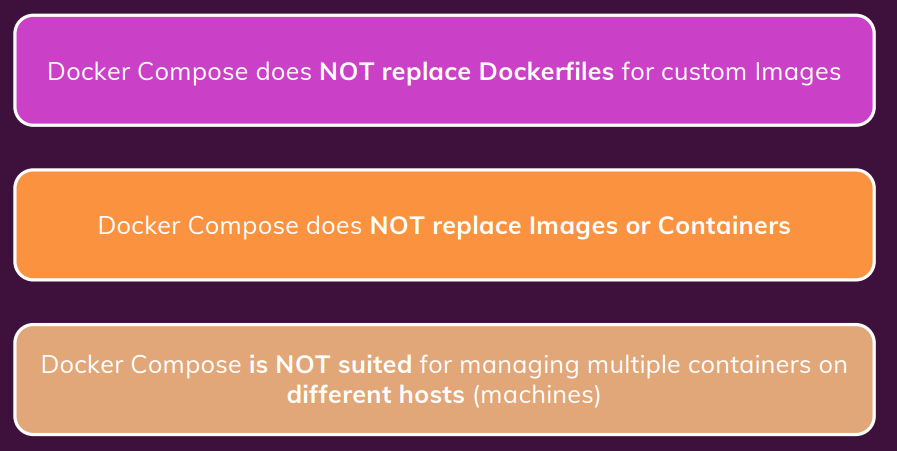
What Docker Compose is NOT
Writing Docker Compose Files
you can do almost anything with docker compose same as docker command in the terminal.
we use YAML file for config the docker compose. YAML is a data serialization language that is often used for writing configuration files. for more information of YAML file please check out this link
Docker compose file reference link
Installing Docker Compose on Linux
On macOS and Windows, you should already have Docker Compose installed - it’s set up together with Docker there. On Linux machines, you need to install it separately.
sudo curl -L "https://github.com/docker/compose/releases/download/1.27.4/docker-compose-$(uname -s)-$(uname -m)" -o /usr/local/bin/docker-compose

sudo chmod +x /usr/local/bin/docker-compose

sudo ln -s /usr/local/bin/docker-compose /usr/bin/docker-compose

docker-compose --version
Docker Compose Files
A docker-compose.yaml file looks like this:
version: "3.8" # version of the Docker Compose spec which is being used
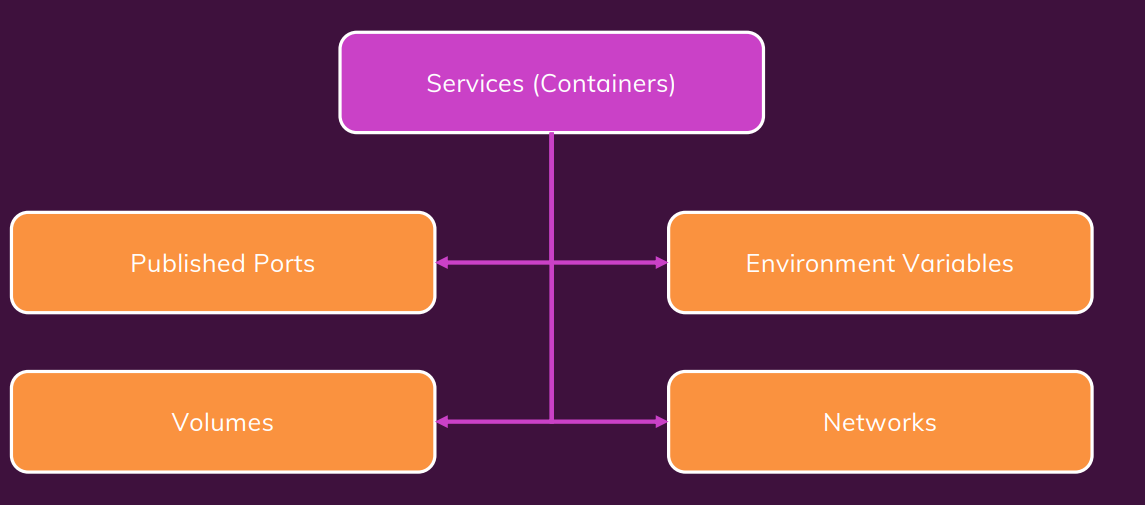
services: # "Services" are in the end the Containers that your app needs
web:
build: # Define the path to your Dockerfile for the image of this container
context: .
dockerfile: Dockerfile-web
volumes: # Define any required volumes / bind mounts
- logs:/app/logs
db:
build:
context: ./db
dockerfile: Dockerfile-web
volumes:
- data:/data/db
below is the docker-compose config file for mutil container example of previouse section.
version: "3.8"
services:
  mongodb:
    image: "mongo"
    volumes:
      - data:/data/db
    #container_name: mongodb
    #environment:
    #- MONGO_INITDB_ROOT_USERNAME=yushin
    #- MONGO_INITDB_ROOT_PASSWORD=admin
    # - MONGODB_USERNAME yushin
    env_file:
      - ./env/mongo.env
    # docker compose will automatically create the network for the container within the YAML file.
    # network:
    #  - goals-net
  backend:
    build: ./backend
    #build:
    #  context: ./backend
    #  dockerfile: Dockerfile
    #  args'
    #    some-arg: 1
    # the detach mode is enable by default, so no need to setup the detach mode.
    ports:
      - "80:80"
    volumes:
      - logs:/app/logs
      - ./backend:/app
      - /app/node_modules
    env_file:
      - ./env/backend.env
    depends_on:
      - mongodb
  frontend:
    build: ./frontend
    # port
    ports:
      - "3000:3000"
    volumes:
      - ./frontend/src:/app/src
    # to enable attach mode, need to add below setting to yaml file
    stdin_open: true
    tty: true
    depends_on:
      - backend
  #  image: "mongodb"
# the name volume shoud be declare here.
# name volume can be shared among container.
volumes:
  data:
  logs:
You can conveniently edit this file at any time and you just have a short, simple command which you can use to bring up your Containers: you can run docker-compose by using below command.
docker-compose up

# to start with detach mode.
docker-compose up -d

docker-compose down

# to remove all volume
docker-compose down -v
You can find the full (possibly intimidating - you’ll only need a small set of the available options though) list of configurations here: link
Important to keep in mind: When using Docker Compose, you automatically get a Network for all your Containers - so you don’t need to add your own Network unless you need multiple Networks!
:bell: Docker Compose Key Commands
There are two key commands:
docker-compose up :: Start all containers / services mentioned in the Docker Compose file
-d: Start in detached mode--build: Force Docker Compose to re-evaluate / rebuild all images (otherwise, it onlydoes that if an image is missing)docker-compose down: Stop and remove all containers / services
-v: ** Remove all volumes** used for the containers - otherwise they stay around, even if the Container are removed.
Of course, there are more commands. You’ll see more commands in other course sections (e.g. he “Utility Containers” and “Laravel Demo” sections) but you can of course also already dive into the official command reference.
What are Utility Containers
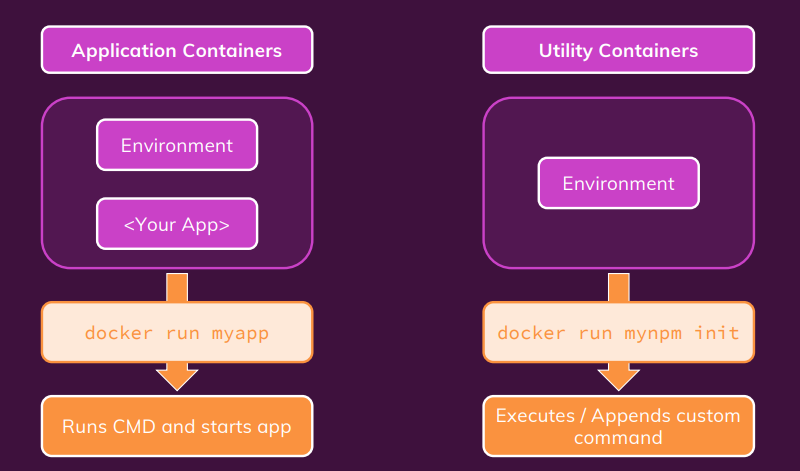
we can use docker as a utility, by using that we can easily using the software such as node/npm without install on our hostmachine.
Different ways of running command in Container
for example, you can using node command by docker utility container.
docker run -it node
to use docker utility we need to setup through docker file. the ENTRYPOINT is similar with CMD, but it allow to append running command after the entry points.
FROM node:14-alpine

WORKDIR /app

ENTRYPOINT [ "npm" ]
after building the image, we can run the docker container utility by running below command. bind mount help to move the file from the container to host machine.
docker build -t mynpm .
docker run -it -v "D:\Source\Git\Docker\docker-utility":/app mynpm init
Docker compose can help to reduce the command and we don’t need to remember long command. docker compose file.
version: "3.8"
services:
  npm:
    build: ./
    stdin_open: true
    tty: true
    # volume
    volumes: #
      - ./:/app
this time we don’t need to run docker-compose up/down, instead we use docker-compose run --rm npm init
The target setup
this project need alot of setup step to accomplish, that the reason this project is good example of using docker to hander complicated setup. The below image show the structure of our Laravel setup, it need totaly 6 containers, 3 apps container and 3 utility containers.

docker compose file
The setup of docker compose file is simmilar with previous section.
version: '3.8'

services:
  server:
    # image: 'nginx:stable-alpine'
    build:
      context: .
      dockerfile: dockerfiles/nginx.dockerfile
    ports:
      - '8000:80'
    volumes:
      - ./src:/var/www/html
      - ./nginx/nginx.conf:/etc/nginx/conf.d/default.conf:ro
    depends_on:
      - php
      - mysql
  php:
    build:
      context: .
      dockerfile: dockerfiles/php.dockerfile
    volumes:
      - ./src:/var/www/html:delegated
  mysql:
    image: mysql:5.7
    env_file:
      - ./env/mysql.env
  composer:
    build:
      context: ./dockerfiles
      dockerfile: composer.dockerfile
    volumes:
      - ./src:/var/www/html
  artisan:
    build:
      context: .
      dockerfile: dockerfiles/php.dockerfile
    volumes:
      - ./src:/var/www/html
    entrypoint: ['php', '/var/www/html/artisan']
  npm:
    image: node:14
    working_dir: /var/www/html
    entrypoint: ['npm']
    volumes:
      - ./src:/var/www/html
run composer utility container to generate the source code of our application
at first, we need to create our laravel source code by using composer utility container.
docker-compose run --rm composer create-project --prefer-dist laravel/laravel .
after that, we need to change the eviroment variable of the laravel source code in ./src/.env to our database container.
DB_CONNECTION=mysql
DB_HOST=mysql
DB_PORT=3306
DB_DATABASE=homestead
DB_USERNAME=homestead
DB_PASSWORD=secret
next step we will start out application by docker compose.
docker-compose up --rm -d server php mysql
if there is error related to permision of vendor folder, please delete this folder and run the composer update command
docker-compose run --rm composer update
We can also just run only the server container by adding the dependency in docker compose file.
    depends_on:
      - php
      - mysql
and then run the command docker-compose up --rm -d server
Run docker utility artisan to migrate the database
Please check the mysql password and username in .env file and also make sure to run ather 3 app container.
docker-compose run --rm artisan migrate
if there are any problems with migration you can you below command to refresh.
docker-compose run --rm artisan config:cache
docker-compose run --rm artisan config:clear
docker-compose run --rm artisan cache:clear
after finish all setup step, you shoud see the below page.

Why we need docker


Development to Production: Things To Watch Out For

Bind Mounts, Volumes & COPY

A Basic First example: Standalone Nodejs App

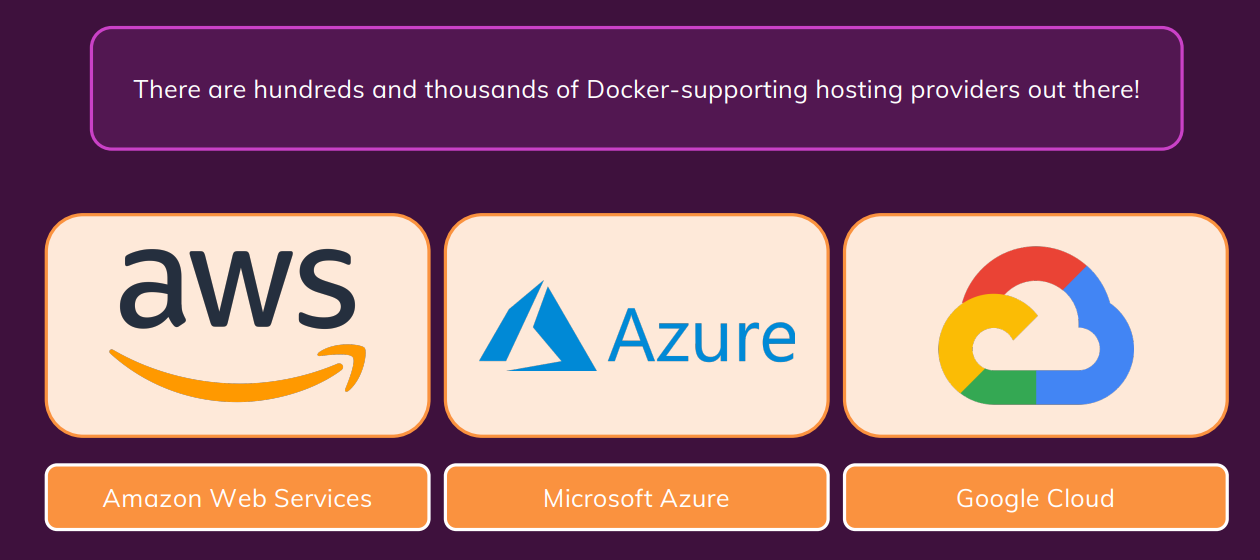
Hosting providers
deploy to AWS EC2
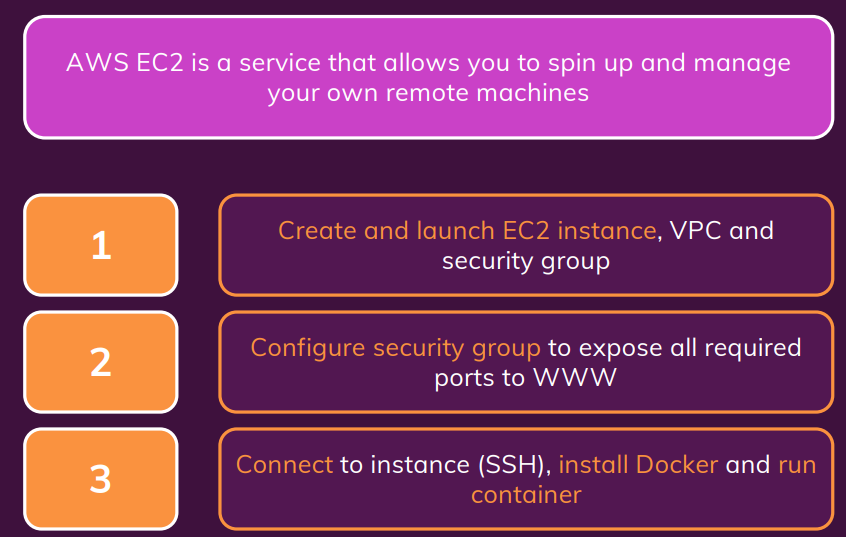
create AWS EC2 instance
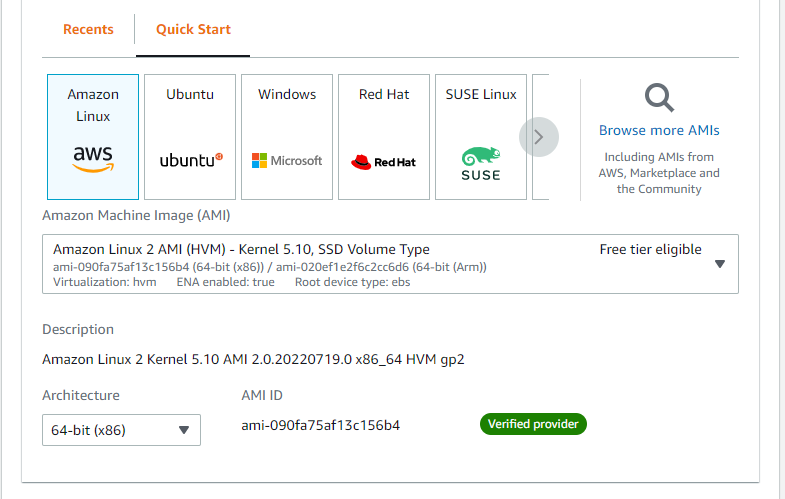
go to EC2 instance dashboard, click on Launch instances.
then select amazon linux version of instance.
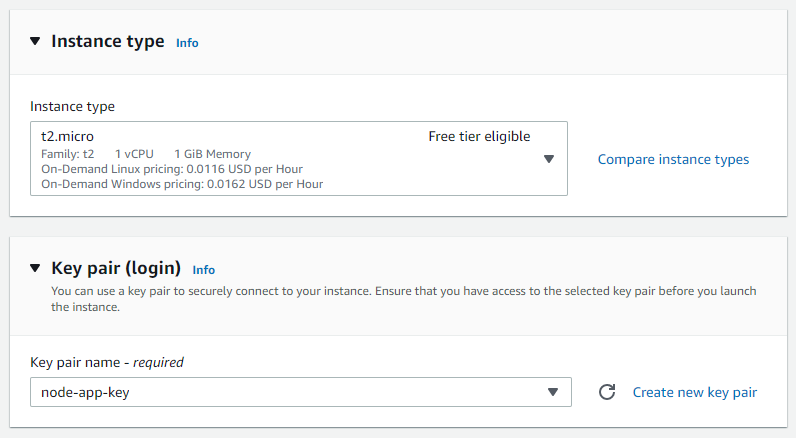
select instance type t2.micro free tier eligible (for free). Please also select the key pair, if you don’t have you can create new key pair.
note that, this key pair only provide onece, if you lost it you have to delete your instance. we have two type of key pair one for openSSH (linux, mac os), one for putty (window).
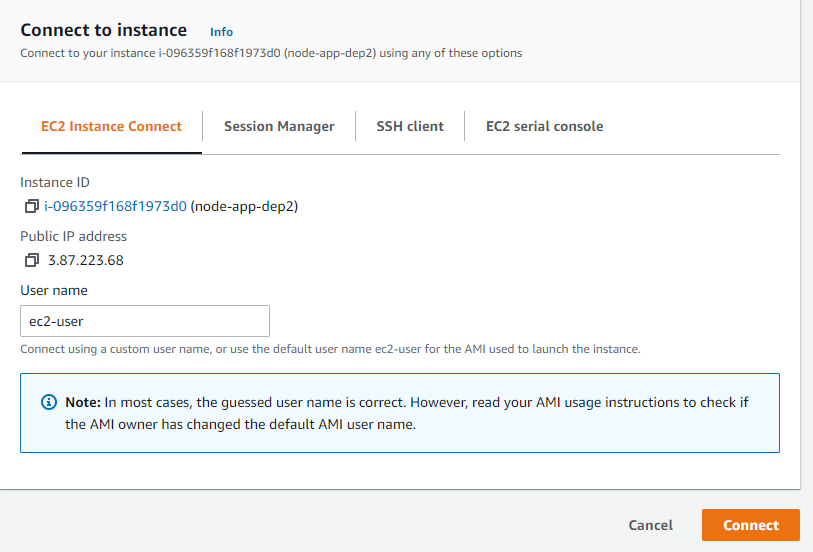
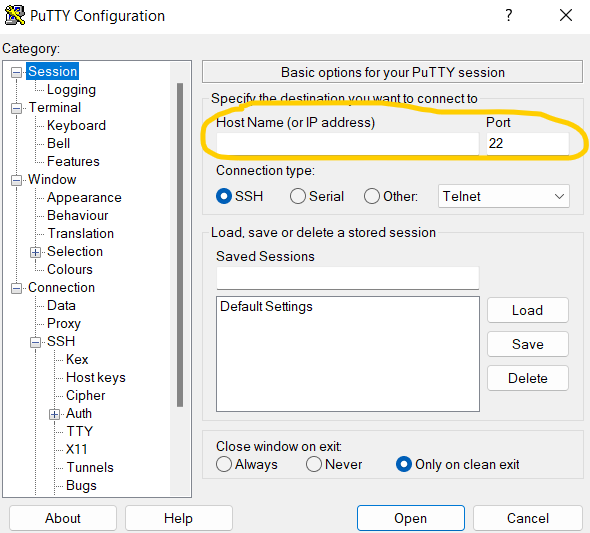
after completed the setting select launch instance and start connect to your virtual host. in my case I use putty. you can get the connect information in the instance connect session.
Putty setup for new ssh session.

after conected you’ll see as below image.

please run update pakage command sudo yam update -y for aws-linux or sudo apt update for ubuntu.
then use can use the amazon-linux-extras to install docker, this is customize tool of amazon for easy intall program.
sudo amazon-linux-extras install docker
to start docker service please use sudo service docker start
incase of linux general os please folow the instructor on docker
Deloy Source code vs image
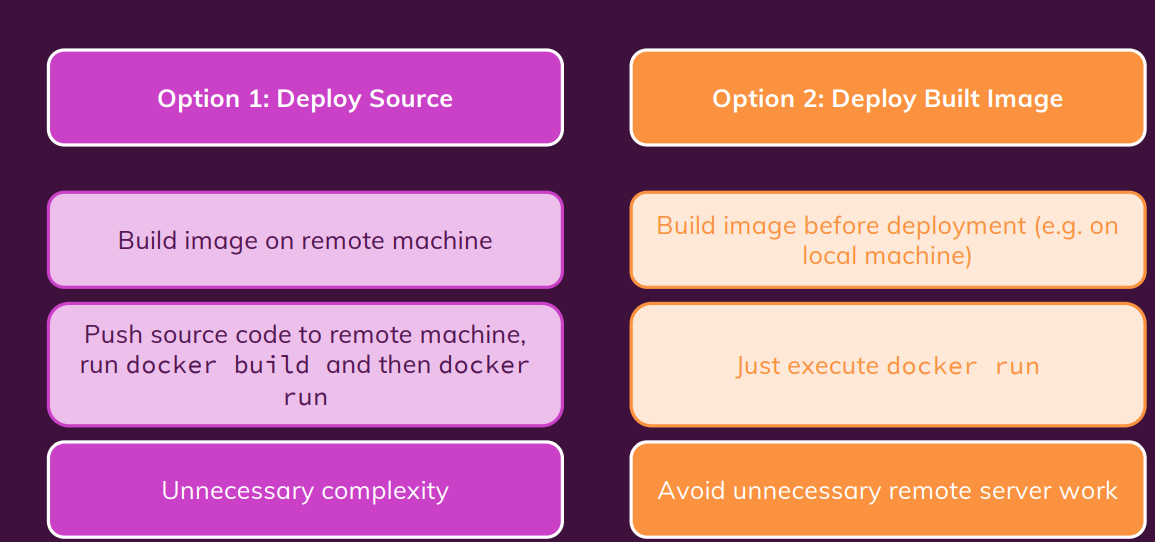
- Create repository on docker hub.
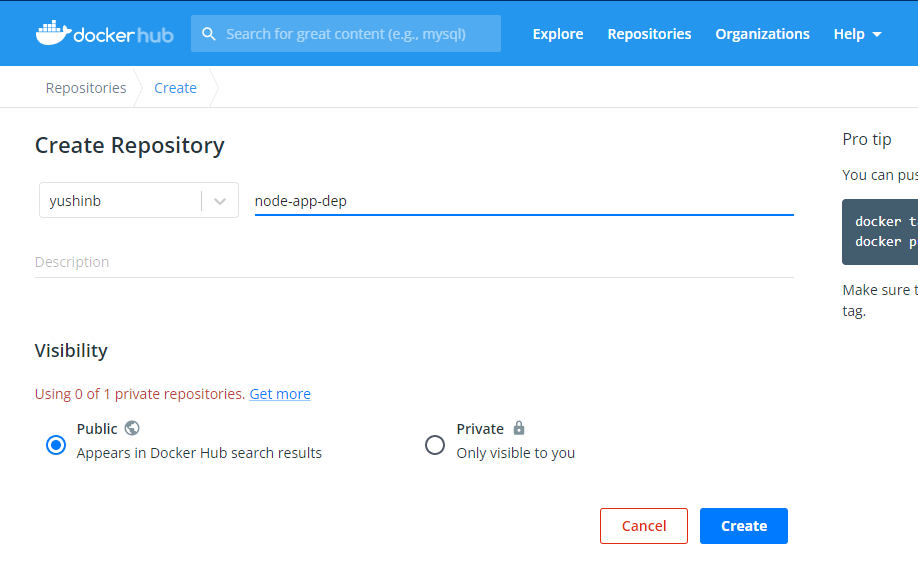
- Build immage on local machine and push it to Docker hub.
docker build -t  node-app-dep-1:1.0 .

# make a tag
docker tag node-app-dep-1:1.0 yushinb/node-app-dep-1:1.0
# push to docker hub
# please login at first
docker login
docker push yushinb/node-app-dep-1:1.0
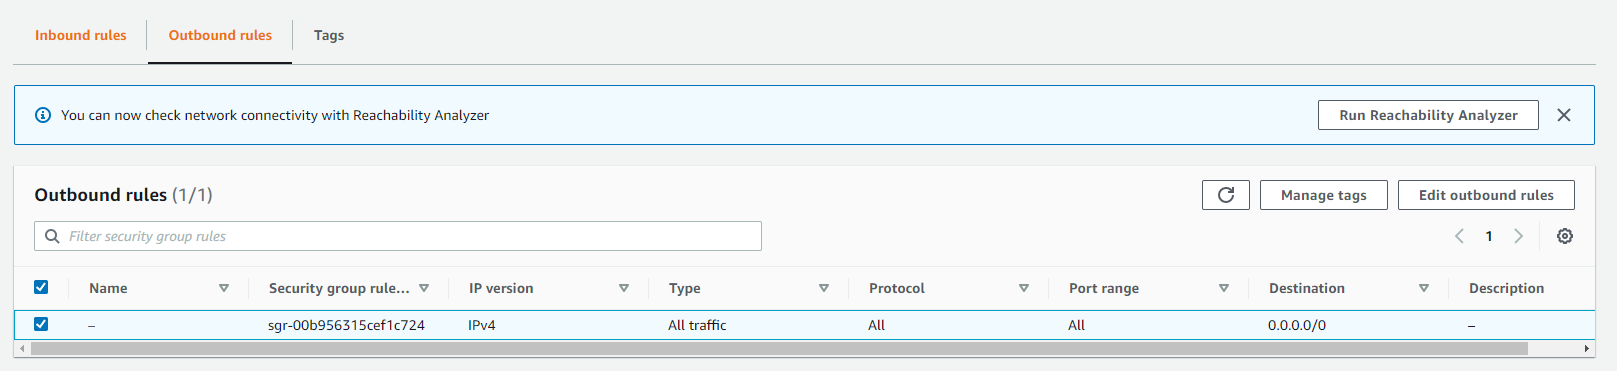
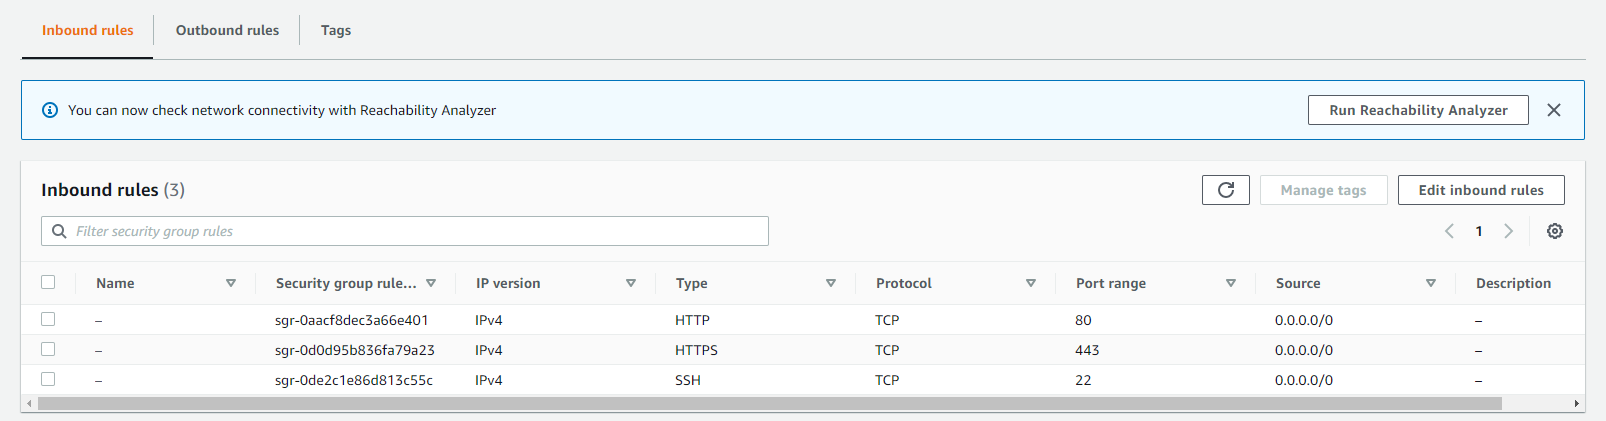
To get access to the web page we need to set the Security groups inside EC2. you’ll see currenly, outbound group are open for any port and any type of trafic from instance to outside, that the reason why you can download the image.
On the other hand, the inbound just allow some port can be access from outside the instance.
managing and updating the Container
if you make any change in your source code then you need to build the image again. after that push image to dockerhub.
docker build -t  yushinb/node-app-dep-1:1.0

docker login
docker push yushinb/node-app-dep-1:1.0
update new image on virtual host machine.
sudo docker pull yushinb/node-app-dep-1:1.0
sudo docker stop node-app
sudo docker run -d --rm --name node-app -p 80:80 yushinb/node-app-dep-1:1.0